How to use UV Mapping in Blender
 |
| Finished UV Mapping |
What is UV Mapping?
UV Mapping is a process used in 3D Modelling, to simulate the surface of a 3D object using a 2D image. A 2D diagram or “UV Map” of the 3D Object is created to know where on the image each part of the object is, and where you put a texture on the object.
Why use it?
UV mapping is used when you want to put multiple colours/textures onto one mesh. The object is split up into different parts on a map, allowing it to be textured one part at a time.
How-to
Step One:Start up the file with the object you want to UV map or create a new object.
 |
| Unmapped mayonnaise bottle |
Step Two:Select the Object by right clicking and go into edit mode (TAB). Select the Shading/UV’s tab on the far left by left clicking it.
 |
| Shading/UVs panel |
Set your selection preference to edges (middle) underneath the stage and select edges suitable to be a seam (normally outer edges or where the shape bends) by Alt+Shift clicking them to get the full edge, and to select multiple edges like so:
 and select edges suitable to be a seam (normally outer edges or where the shape bends) by Alt+Shift clicking them to get the full edge, and to select multiple edges like so:
 |
| Selecting edges of object |
Then click “Mark Seam” under UVs in the left toolbar.
Step Three: right click the grey line between the stage and border at the top of the screen and select “Split area"
 |
| Split Area |
Obviously you don’t need two of the same screen, so in the bottom left of which ever one you want, click the little box shown below and select “UV/Image editor”.
 |
| Editor Type select |
This will make the stage look like this:
 |
| UV Editor area |
if you use the same file as me this window will already be open and you won't have to do this part.
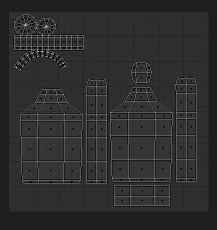
Step Four:in the stage that still shows the object, press A until everything is highlighted in yellow. Then press U and click “Unwrap” different parts of the object (separated by the seams) will then appear in the second stage.
 |
| UV Map |
You then click the UVs tab underneath the UV editor stage (right side of image above) and click “export UV” layout and save it where you want.
 |
| "UVs" menu |
Step Five: open the .png you just saved of the UV map in Photoshop (or MS paint) using File>Open and finding the file.
 |
| file open |
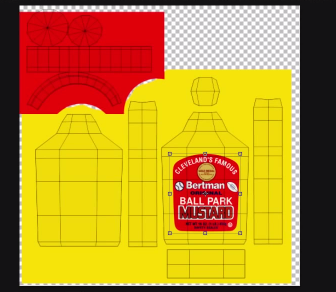
Start a new layer, underneath the UV map’s layer and paint the shapes whichever way you want. To know which shape you’re painting, go back into blender, change the edge selection to face selection and in the stage displaying the object select a face. It will then highlight in the UV editor stage, letting you know which part is where on the UV map. When painting the object in Photoshop it is not necessary to paint outside the shapes of the UV map, and if you do it will not affect the texture when it is mapped onto the object at all. when saving the file make sure that the colour layer is above the UV map layer. The end product should look something like this:
 |
| finished painting of map |
Step Six:After you save over the UV map .png with your newly edited one, go back into blender. Make sure everything is highlighted in the object stage and if it isn’t hover over it and click A. change “blender render” to “cycles render” above the stage next to the version then in the right toolbar click the material bar and click “new material” as shown below.
 |
| Adding a Material |
Then, on the stage that we changed to the UV editor, click the little box we used to change it again and select “Node editor” which will give you the screen below.
 |
| Node Editor |
Click “Add” underneath this new stage, and select Texture>Image texture. Connect the yellow colour circle on the new box to the yellow colour circle on the diffuse box. Then click open and find the new UV map we created.
 |
| image added to Node Editor |
With the correct lighting and camera placement, when you view the rendered image by pressing F12, you should come out with something like this:
 |
| finished UV mapped object |
As you can see from the preview above, UV mapping allowed me to use multiple colours and textures for this bottle of mustard including the yellow, red and even the texture of the label. This can be used from something as simple as this static mesh, to an entire character for a game. Enjoy practising it out.
How to use UV Mapping in Blender
 Reviewed by Opus Web Design
on
03:04
Rating:
 Reviewed by Opus Web Design
on
03:04
Rating:


